YPQs (Your Possible Questions)
1. Experience level in making helmets:
-Level 1 (first-time)
2. How long did it take to finish?
-Half a day
3. What materials were used?
-a really cheap safety helmet
-tape measure
-marker
-pattern paper or newspaper will do
-illustration board
-handy bow saw
-sand papers (cc400cw)
-a dozen of the smallest screws and nuts
-cutter and scissors
-sticky tape
-duct tape
-spatula
-mask
-polyester body filler or putty used for cars (you can get this from any hardware stores) + hardener
-airbrush
-surface primer
-white spray paint (400cc)
4. How to make it?
STEP1: Remove the inner foam of the helmet.
STEP2: As you can see in the picture, the "peak" or "bill" of Char's helmet is more of a V while the safety helmet we have is more of a U.

 STEP 3: Draw a V. Make sure you find the center point.
STEP4: Following the mark you've made, saw the bill. You don't have to use too much force when sawing.

STEP5: Sand the rough edges of the sawed bill.

Step 6:Using this reference photo, draw the helmet's "back arc" (sorry we don't know how else to call it) on a pattern paper. Cut and paste it on your helmet to see if it fits and if it's the right length on you.
 STEP7: Once you've finalized the pattern, trace it on your illustration board and cut.
STEP8: Then, screw the board on your helmet.
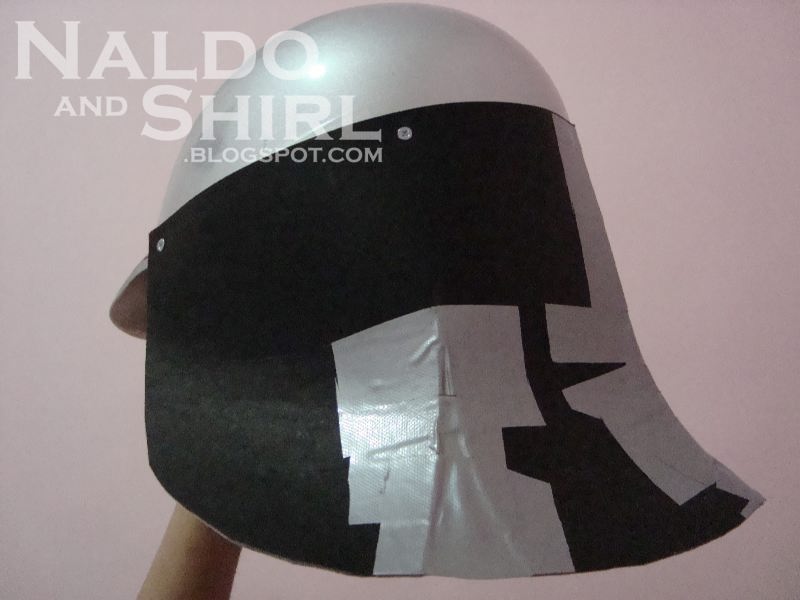 If you want to have that slightly arc effect at the bottom, cut a triangle then bent it outwards a little bit. Cover it up with duct tape.
STEP9: Apply putty to cover the screws and to make the helmet and board look as if they're one piece. By the way, please don't forget to wear mask. The putty smell can be really strong.
 STEP10: Let the putty dry.
 STEP11: When it's dry, the surface will be very uneven. So sand it.
 It doesn't have to look smooth but it has to FEEL smooth. If after sanding and you still notice hollow parts, just cover the small holes with putty. Dry then sand again.
 STEP12: Paint it with surface primer. You may hand-paint if you want but Naldo used air-brush. It's way faster. Then wait for it to dry.
 STEP13: Make the W. We won't be giving instructions on how to do it since it's really easy.
 STEP 14: After you're done with the W, attach it to the helmet. There are so many ways, you can double tape, glue or screw it. It really depends on you.
STEP15: Spray Paint.
 STEP16: Let it dry and voila!
If you don't want to go through all the trouble of making your own, there's this (refer to photo below) for sale. As to where and how to get it, we are not really sure. Even we ourselves couldn't find it. We think it may be only available in Japan or maybe it can be ordered online. 
Anyway, we hope we helped and if you have more questions, the comments box is below.
p.s. Here's a photo of the putty and the hardener we're talking about.

HOW DO YOU APPLY THE PUTTY? WHERE DO YOU BUY THE PUTTY,PLEASE I NEED YOUR HELP! GREAT TUTORIAL BTW!
ReplyDeleteOh we forgot to mention that we also got a hardener for the putty (can't remember the brand). We mixed 1 part hardener with 10 parts putty. Make sure you only mix the (estimated) amount to be used/spread because it dries up in a matter of seconds.
ReplyDeleteTHANKS A LOT! LAST QUESTIONS...SORRY IF I BOTHER YOU..JE...HOW DO YOU MADE THE EYE PROTECTOR? AND THE W IS ALSO CARDBOARD WITH PUTTY? THANKS
ReplyDeleteAND IM NOT VERY SKILLED FOR DOING THIS KINDA STUFF...AND I REALLY WANT TO MAKE MY OWN HELMET...I HAVE SOME DOUBTS ABOUT THE W HOW TO MAKE AND ABOUT THE ILUSTRATION PAPER,IM FROM A NON ENGLISH SPEAKING COUNTRY,I KNOW HOW TO SPEAK IN ENGLISH BUT SOME WORDS ARE UNKWNOWN TO ME,PLEASE HELP ME!!(AGAIN)
ReplyDeleteOh you're not a bother at all. You don't have to be skilled, you just need to experiment (a lot!) ;P. Illustration board is a kind of board that's white on the front and black at the back. It's quite sturdy and very cheap that's why we choose it. But you can use any boards to your liking. Yup the W is also cardboard (Sorry we forgot to take pictures). We didn't put putty on that anymore. First draw the W on the board, cut using a cutter so that it will be neat (please be careful) then trace. Now you have two Ws. Then estimate how thick you want your W. Cover the sides with the same board to give it the 3d effect. We used stick glue to put all sides together.
ReplyDeleteBy the way, the W might be too heavy so you're next problem will be how to attach it on the helmet. What we did was that we punched holes on the helmet and the W (using a small drill) and screwed it together.
ReplyDeleteWe're not very good at giving instructions as well so if you have more questions please do not hesitate to ask. We'll try to help you as much as we can.
The eye protector is also card board. We just covered it with white leatherette. You can also use white cloth. For the "lens" or eye area, we just used white stockings.
ReplyDeleteOh gosh, we hope this isn't too late. Please use the putty used for car bodies or Polyester Body Filler (Polituff brand) + Cream Hardener and NOT the Bostik brand that we mentioned before. We added a photo at the end of this post for your reference. (We have different kinds of putty at home and we had them mixed up. We are truly sorry for the confusion.) You can get car putty from hardware stores.
ReplyDeleteAlso once you're done with your costume, please do leave us a link where we can see it. Thank you so much and good luck! :-)
I WILL THANKS FOR ALL YOUR HELP!!! =)
ReplyDeleteHERE IS MY CPSPLAY THANK YOU FOR ALL :) http://www.metroflog.com/MAJINSTARSCREAM
ReplyDeleteAND HERE IS A VIDEO WITH MY COSPLAY http://www.youtube.com/watch?v=wD6y6iQ6LbI THANKS AGAIN :)
ReplyDeletenice helmet and eye protect card but not use for bike riding.
ReplyDelete